These links connect to in-depth articles related to the major naval engagements. Please note that there is a separate section for naval battles. These articles were published by various authors.
Engagements
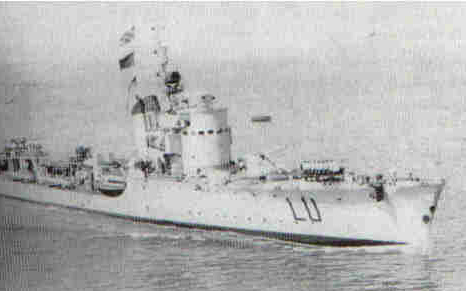
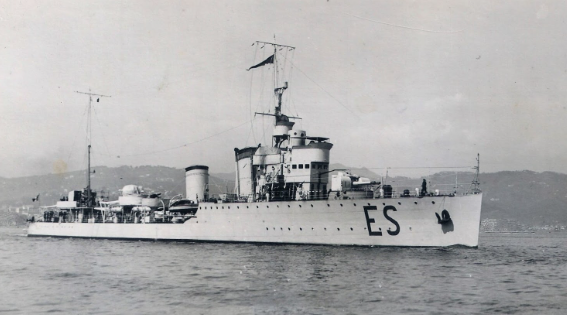
Cape Bon – The sinking of the Da Barbiano e Di Giussano
December 13th, 1941
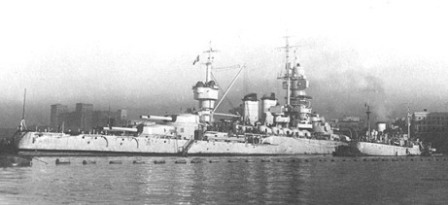
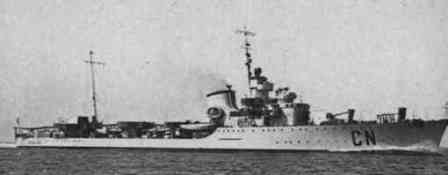
The most authoritative book on the role of ULTRA in the Mediterranean conflict, “Il Vero Traditore” (The Real Traitor), written by Alberto Santoni, displays on its jacket the two light cruisers Da Barbiano and Di Giussano: this is not just a coincidence. After the tragic battle of Matapan, the night encounter of December 13th, 1941 was one of the worst disasters of the Italian Navy, and like the famous battle, it was brought about by the treacherous effect of technical superiority. But where at Matapan British intelligence was sketchy, in this case it was lethally accurate.
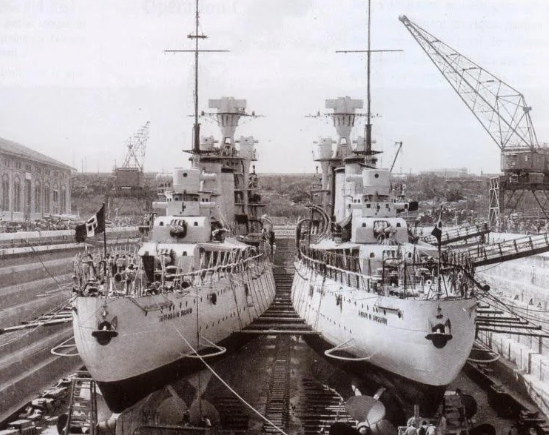
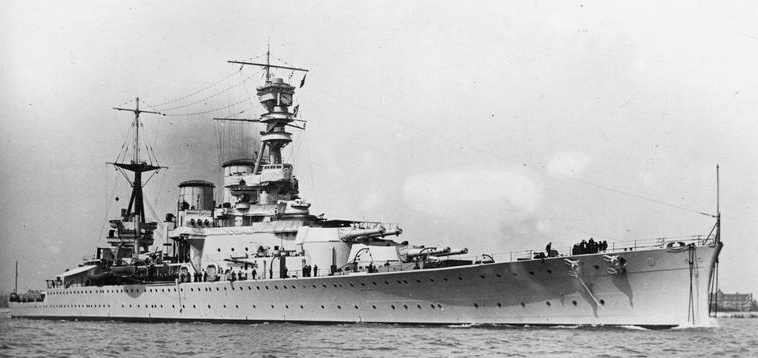
The R.N. Da Barbiano and R.N. Da Giussano in drydock around 1930
By the end of 1941, the situation in North Africa was near desperate. British forces were advancing under the impetuous operation “Crusader.” Fuel had almost been exhausted; Axis vehicles could not operate, airplanes assigned to the defense of Tripoli could not fly, and the whole war effort appeared near collapse. Once again, the Regia Marina was asked to deliver much needed supplies to the besieged colony.
December was a terrible month. With the arrival of force “B” in Malta by November 29, strengthened by the cruisers Ajax and Neptune and the destroyers Kimberly and Kingston, and under the command of Admiral Rawling, the Royal Navy had reasserted control over the Italian supply lines. After the successful arrival of the M\v Veniero, on December 1st, the ships following (Capo Faro, Adriatico, Mantovani) were all sunk with great loss of life and desperately needed supplies. It was then decided to use the battleship Duilio to provide for general coverage in the central Mediterranean, but as soon as the Italian Fleet left, British control was immediately reasserted.
Desperate situations call for desperate measures, and on December 4th, it was therefore decided to use military vessels to deliver supplies to Libya. The cruiser Cadorna was able to deliver personnel and fuel from Taranto to Benghazi on December 11th, two days before the Da Barbiano and Di Giussano had left Palermo for Tripoli. Meantime, the British were perfectly aware of the Italian mission which they were tracking via ULTRA.
After having been spotted by British aircraft, the commander of the formation, Admiral Toscano, ordered a return to port. With a large convoy scheduled to reach Libya on the 14th, the Regia Aeronautica was desperate for fuel. The two cruisers, again loaded with fuel stored on deck in large drums (100 tons of gasoline, 250 tons of diesel fuel, 600 tons of fuel oil, 900 tons of food and 135 military personnel), left port on the 12th. The cruiser Bande Nere, which was scheduled to participate, was left behind due to malfunctions, and the torpedo boat Cigno was sent instead.
Meantime, the destroyers Sikh, Legion, Maori and Isaac Sweers, this last one a Dutch vessel, under the command of Captain Stroke, left force “K” in Gibraltar to reinforce force “B” in Malta. The formation was reported by Italian Cant.Z.1007bis (1), but speed and direction gave Supermarina the erroneous sense that the two Italian cruisers would have enough margin of maneuver to avoid the British. Under the direction of ULTRA, the British formation increased speed and easily reached the Italian ships.
At 3.15 AM on December 13th, with the help of the Radar and completely undetected, the British ships maneuvered and launched an initial salvo of ten torpedoes. The Di Giussano was able to fire three shots before sinking, while the Da Barbiano was turned into a towering inferno, unable to return fire. The Cigno fought back, but to no avail. The British units left as quickly as they had come. The Cigno was able to rescue 500 sailors, while others reached the coast or were later saved by Italian M.A.S.. Over 900 men (2) lost their lives, including Admiral Toscano.
The only British mistake was reporting that the Bande Nere was present during the engagement, but this was probably due to the fact that the substitution of the Cigno for the disabled ship was not transmitted over radio dispatch and therefore it could not be intercepted.
(1) James J. Sadkovich “The Italian Navy in World War II”
(2) James J. Sadkovich reports 1225.
(3) Alberto Santoni, “Il Vero Traditore”
The Duisburg (Beta) Convoy Battle
November 9th, 1941
The losses incurred by the Royal Navy in the Eastern Mediterranean during the evacuation of Greece and Crete in April and May, 1941 forced withdrawal of the Malta surface strike force. It was not reconstituted until October 21 when Force K, the light cruisers Aurora and Penelope and the destroyers Lance and Lively under the command of Captain Agnew arrived at Valetta’s Grand Harbor. As with Mack’s efforts in April, Agnew’s first two attempts to intercept Italian convoys on the nights of 25/26 October and 1 / 2 November failed. And like Mack, he succeeded on the third try, but even more spectacularly.
The Italians knew that surface ships had returned to Malta within a day of the event and fully appreciated the danger they represented. However, the tempo of the North African land war during the fall of 1941 dictated that more, not less supplies be shipped. Consequently an important convoy of seven ships, the German steamers Duisberg (7,389 tons) and San Marco (3,113 tons), the Italian motorships Maria (6,339 tons), and Rina Corrado (5,180 tons), the Italian steamer Sagitta (5,153 tons) and the Italian tankers Minatitlan (7,599 tons) and Conte di Misurata (5,014 tons) gathered at Naples. They were loaded with 13,290 tons of materiel, 1,579 tons of ammunition, 17,281 tons of fuel, 389 vehicles, 145 Italian troops and 78 Germans. Supermarina named the convoy Beta, and provided a generous escort. The direct escort consisted of destroyers Maestrale, flag of Captain Ugo Bisciani, Fulmine, Euro, Grecale, Libeccio and Oriani. The distant escort included heavy cruisers Trieste, flag of Rear-Admiral Bruno Brivonesi, and Trento with destroyers Granatiere, Fuciliere, Bersagliere and Alpino. The route took Beta east of Malta bound for Tripoli. Italian doctrine and experience dictated that the principal danger from the night portion of the passage would come from aircraft, that a surface interception was nearly impossible unless the convoy’s exact route and speed were known. Nor did the Italians appreciate the capabilities of radar.
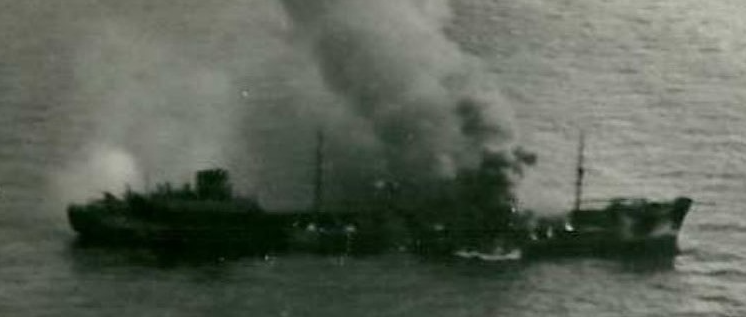
The tanker Minatitlán on fire and sinking in the morning of 9 November 1941
The British learned of the convoy through Ultra intercepts of German Air Force transmissions (Webmaster note: Santoni denies this ever happening). A Maryland reconnaissance plane out of Malta “discovered” the convoy on the afternoon of the 8th. Force K sailed from Malta at 1730 and visually located the convoy about 135 miles east of Syracuse at 0039 on the 9th. The convoy was sailing at 9 knots in two columns about a half-mile apart. On the starboard side the order was Duisberg, San Marco and Conte de Misurata. On the port Minatitlan led Maria and Sagitta while Rinacorrada brought up the rear between the two columns. The distant escort followed about three miles astern, off the convoy’s starboard quarter, sailing at 12 knots. Maestrule sailed at the head of the convoy while Fulmine, and Euro guarded the starboard side, Libeccio and Oriani the port side and Grecale, followed up the rear. Force K was in line-ahead with Aurora leading followed by Lance, Penelope and Lively. After Aurora’s sighting, Agnew maneuvered to a position down-moon of the Italians, putting his ships on the convoy’s starboard quarter. During this evolution, the direct escort sighted the British, but mistook them for the friendly cruiser group.
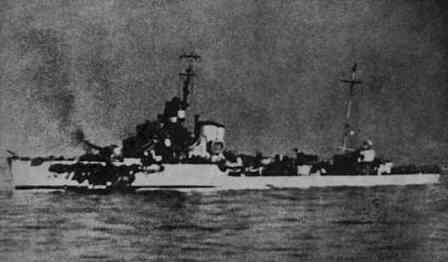
R.N. Fulmine
Once in position, Force K laid guns with radar and opened fire at 0057 from 3,300 to 5,500 yards. The bright moonlight silhouetted the Italian ships adding to the tactical and technological advantages the British already enjoyed. Aurora targeted Grecale and scored hits with her first three salvos, setting off an explosion, starting a fire and leaving her dead in the water. Penelope’s initial salvos hit Maestrale. Lance took on one of the cargo ships and, after obtaining hits from 4,000 yards, shifted fire to Fulmine. Lively was the last to open fire at 0100. She hit Duisberg with her first salvo and followed with five more before shifting her guns to Euro. These initial salvos were deadly and indeed the whole action was characterized by extremely accurate shooting by the British.
Aurora then fired on Maestrale. She was making smoke and withdrawing around the front of the convoy to its port side. She ordered Libeccio and Oriani also on the port, the unengaged side, to make smoke. Bisciani then ordered the escorts to gather around him. This order and the destroyer’s movements supports the suggestion that he believed the attack was coming from the port, not the starboard, side and that he continued to mistake the ships of Force K for Trieste and Trento. In any case, after issuing these instructions, Bisciani lost his ability to influence the battle further when Aurora shot Maestrale’s radio antenna away.
Euro and Fulmine on the right of the convoy had a better appreciation of the situation. They counterattacked the British, but Fulmine was quickly hit hard and repeatedly by Lance and then Penelope. She returned fire only briefly before she turned over and sank at 0106, just nine minutes into the action. Euro, commanded by Cigala Fulgosi, who successfully defended the second Cretan Convoy with Sagittario, approached to within 2,100 yards of the British without suffering damage. He had a perfect torpedo setup and was about to launch when Maestrale’s orders made him wonder if he was attacking his own cruisers. He turned away, but realized his mistake when first Lively and then Aurora and Penelope brought him under fire. Euro was hit six times, but the 6″ shells passed through her thin hull without causing major damage.
The Italian distant escort was about 5,500 yards from the convoy’s right side (the Malta side) when the action opened. They came up increasing speed to 24 knots as the British sailed away and then circled around the head of the convoy and down it’s opposite side at 20 knots. The Italian cruisers were not slow in engaging the British, opening fire at 0103 from 7,800 yards, but their position was bad and quickly became worse. In effect, the British unintentionally kept the convoy between them and the heavy cruisers. Trieste and Trento shot off 207 rounds of 8″ and 82 rounds of 3.9″ ammunition, but by 0125, they ceased fire, reporting the British were out of range. The British assumed these vessels were more destroyers and Aurora returned fire with her 4″ guns, but the range was too great for these to be effective.
The convoy ships, meanwhile, believed they were under aerial attack and took no evasive action throughout. From 0110 Agnew proceeded to circle around the head of the convoy and then up its port side, at ranges down to 2,000 yards, picking off merchant ships with gunfire and torpedoes. The British were rather astounded at the way the cargo ships continued serenely on course, almost waiting their turn to be sunk. Libeccio and Oriani with Maestrale and Euro of the direct escort withdrew about ten miles to the east of the convoy and regrouped. They then counter-attacked as a unit, firing salvos, but declining to use torpedoes for fear of hitting their own ships beyond the British. It is interesting to compare this reticence with the Japanese action at the Battle of Sunda Strait. The Japanese didn’t hesitate to fill the waters with torpedoes to get at Allied warships attacking transports, sinking four of their own transports as a consequence. The four destroyers led by Maestrale continued to make smoke and periodically engaged as they came in view, but they failed to seriously challenge the British and suffered only slight damage to Libeccio as a result. Meanwhile the distant escort continued sailing down the convoy’s starboard in the opposition direction.
In effect, the Italian heavy cruisers and Force K switched places, the first ending up south and west of the convoy by the time the British were north and east. Agnew ordered cease-fire at 0140 as the British passed by the rear of the now destroyed convoy. No new targets were seen, and concerned with the shortages of 6″ ammunition at Malta, (Penelope, for example, shot off 259 6″ rounds) the British shaped course for home at 0205. They sank every one of the cargo ships and tankers and sank one destroyer and damaged three others. Although on several occasions the British reported they avoided torpedoes, Italian accounts deny that any of their destroyers used this weapon. The only injury suffered by the British was splinter damage to Lively. A star shell burst overhead and near misses holed her funnel and a steam pipe on the starboard siren. To add to the Italian’s misery, the British submarine Upholder torpedoed Libeccio the next day at 1048 while she was engaged in rescue work. Euro tried to tow the stricken ship to safety, but Libeccio broke apart and sank shortly after.
This battle was one of the most complete victories won by the British during the war. They were out numbered and outgunned by the escort, but application of superior doctrine and technology along with luck and surprise gave them the victory. Both Brivonesi and Bisciani were relieved, although Brivonesi was subsequently returned to command.
Reference: 08/09 Nov 41.R&H 97, B 132-133, Ireland 103, Grove 57-59, Smith/Walker 46, Bekker 238-240, S196-197. Greene196-196
Text copyright Vince O’Hara, 2000
The Torpedo Boat Lupo
May 22nd, 1941
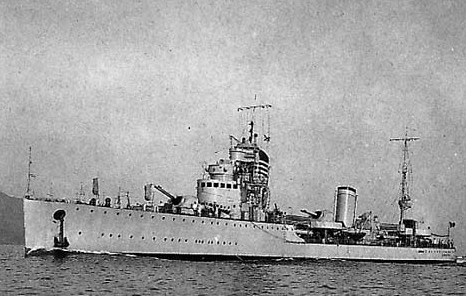
The German plan for the occupation of Crete was ready since the end of April 1941. The invasion of the island would be the exclusive task of the German air force (Luftwaffe); paratroopers would occupy the enemy airfields where, later on, would land the 5th Alpine Division which would complete the occupation of the island. The plane gave little room to the German army, and even less to the Italian armed forces. A few days before the attack, German generals who depended heavily on surprise, changed the general plan and decided to organize secondary landings of alpine troops along the Cretan coast. The Regia Marina was asked to navigate, not escort, these landings since the Lufwaffe would have provided for the necessary coverage for these small boats full of soldiers, and would have “sunk any ship which dared to adventure itself close to Crete.”
The Torpedo Boat R.N. Lupo
At that time, the Regia Marina had limited resources available in the Aegean theater and only the 1st and 16th Torpedo Boat Squadron, 4 MAS, 13 minesweepers and a few submarines were assigned to this operation. On the 19th of May, one of these convoys left the port of Piraeus. It included 21 small boats, but 7 had to return to port due to technical failures. They were loaded with 2,331 soldiers of the III/100th Gebirgjaeger (alpine troops) and artillery personnel of the Luftwaffe. The torpedo boat Sirio was assigned to the convoy, but when her starboard propeller failed, she was replaced by the torpedo boat Curtatone. Unfortunately, this second unit sank on a mine while she was trying to reach the convoy. Ultimately, the torpedo boat Lupo was ordered to replace the Sirio and escort the convoy to Crete.
Engagement
The delay caused by the Sirio’s failure and the confusion amongst the boats, none of which was equipped with radio apparatuses or any other equipment needed for such a dangerous crossing, caused the Lupo to fail to locate the convoy until sunrise of the 21st. The commander of the small Italian unit, C.C. Francesco Mimbelli, after having instructed all units by means of voice command and flag signaling, began the final navigation towards Crete, which, at that point, was still 50 miles away. At 7:15, the Italian unit received orders to stop and wait for further orders, which, on the clock, arrived one hour later. The torpedo boat and the convoy were ordered back to Milos. At 11:00 another order took the convoy back towards Crete at full speed (even leaving slower boats behind) for a landing on the morning of the 22nd.
The R.N. Lupo showing some of the British hits
Why so many contradictory orders? In the morning, a reconnaissance plane had discovered a British squadron, which, inadvertently, would have crossed the convoy’s path. Therefore, the decision was made to cancel the convoy, but a later airplane mistakenly signaled that the enemy formation had changed route and the convoy was ordered back to Crete. The British squadron included the cruisers Ajax, Orion, Dido and the destroyers Hereward, Hasty, Janus and Kimberly under the command of Adm. Irvide G. Glennie aboard the Dido. This force was immensely superior to the lonely Italian torpedo boat.
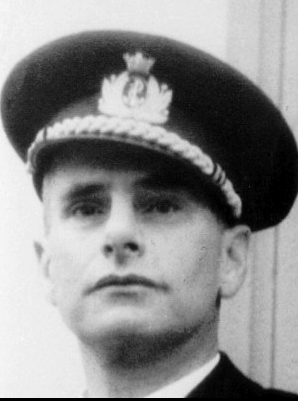
Francesco Mimbelli , here with the rank of Vice-Admiral (2nd Class) Rear Admiral in the British Navy
At 22:33, while the torpedo boat was 5 miles north-north east of Cape Spada, a lookout signaled an enemy destroyer at about 1,200 to 1,500 meters to the right. This was the Janus which had just discovered the convoy and had maneuvered to change course. At 22:34, the Lupo launched two torpedoes from the aft apparatus, but the change of course caused the weapons to miss their target. A minute later, the Lupo sighted an enemy cruiser and immediately after fire was opened. The torpedo boat launched the two remaining torpedoes against the British cruiser, estimating its speed to be 20 knots. The actual speed was 28 knots, but the estimated distance of 700 meters was accurate. Immediately after, the torpedo boat veered left and opened fire while the very precise British fire reached the boat various times. Damage was not too serious, but two sailors (Orazio Indelicato and Nicolò Moccole) were killed and another 26 wounded. While the torpedo boat was dodging to the left, another cruiser passed just a few meters from her stern. At that point, the Lupo, nicknamed “the luckiest ship in the fleet”, took advantage of the confusion amongst the British and ran away.
The torpedoes launched at the Dido had missed their target due to the miscalculated speed, but they were not completely lost because they exploded not too far from the Orion, causing various minor damages and the warping of the hull. The Orion was also repeatedly hit by 40mm shots from the Dido, which, in the maelstrom, ended up shooting at her comrade. After having overcome the great surprise, the British ship, thanks to the radar, localized the convoy and sank 10 ships while the others ran away and made it back to Greece; 800 German soldiers had perished in this failed landing.
Final thoughts
For this action, the commander of the Italian torpedo boat, C.C. Francesco Mimbelli, was awarded the Gold Medal for bravery. On the other hand, Adm. Irvine G. Glenne was highly criticized; this time the British vessels had not fought as usual and despite the fact that they had aborted the landing, many boats and the small Italian torpedo boat had run away. Furthermore, the Orion was damaged by the torpedo and by friendly fire. To the British admiral’s credit, it must be said that the Lupo received 18 hits, but due to malfunctioning ammunitions, only three actually exploded.
The Tarigo Convoy
April 16th, 1941
Introduction
Although in the overall economy of the war in the Mediterranean the action resulting in the destruction of the Tarigo convoy was of minor importance, it is fascinating how, through the years, different authors have given such different historical accounts of these events.
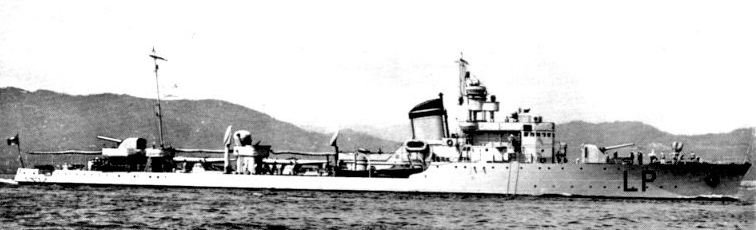
The Tarigo was one of the many convoys organized by the Axis forces in support of the renewed activities of the newly arrived D.A.K. in North Africa. It was named after the destroyer R.N. Tarigo, which was the lead escort. It was a relatively small convoy of four small German ships and one Italian ship escorted by three destroyers.
The destroyer R.N. Tarigo
Discrepancies between historians are to be expected, especially in regard to the war in the Mediterranean where, at times, it appears that they are telling completely different stories. Understandably some of these discrepancies have occurred because of the British government’s rule governing the release of confidential information. As documents were released through the years, more and more was learned, but still some very important folders are beyond the reach of historians.
On the other hand, most Italian documentation was made readily available. Italy had nothing to hide, and actually the search for the truth was part of the national healing process. Italians, perhaps less than the Germans, came out of the war with a general sense of shame, which could only be eradicated by understanding the facts and honoring the fallen. At times, Italy and Italian historians were inclined to write very apologetic accounts of the actions of the Regia Marina, without understanding that there was not much to be apologetic for; the navy had done its best and paid a very high price.
The decision to focus on the Tarigo was easy; the difference in reporting amongst the various authors goes beyond what could be described as personal interpretation and enters the area of fallacious reporting. It therefore makes a good case for comparative history.
The first published report on this action was the one by Captain Mack, the commander of the Malta-based British destroyer force, which decimated the convoy. His May 11th, 1948 report published by the “London Gazette” was later incorporated in Admiral A.B. Cunningham’s “A Sailor’s Odyssey”, published in England in 1951. This report is relatively accurate, but is strictly focused on the night engagement. A.B. Cunningham reveals that the Italian convoy had been sighted by British reconnaissance on April 15th. He continues by saying, “It was a fine clear night with a good moon”. This is the first discrepancy; according to the official Italian report, the weather was actually quite foul and the moon was slightly less than half full. Still, although Cunningham does not say it, British planes were able to fly, while the lone Italian S. 79 sent to defend the convoy had to return to base. Overall, the report is quite accurate, but some of the missing details can be easily explained; after all, it was only a few years after the end of WW II and the cold war was brewing.
Perhaps what was not said was that the sinking of the Mohawk was not just “greatly to be regretted” but it was a failure. Considering that the British forces had shadowed the convoy for over 20 minutes and that the position of all ships had been accurately charted by radar, its sinking was very fortuitous for the Axis forces. Another issue which, in later years, would stimulate the interest of several historians, was the acute difference in timing between the report of the Jervis and the Nubian.
The Ufficio Storico della Marina Militare published the beautifully detailed “La Difesa del Traffico con l’Africa Settentrionale” in 1958, later updated in 1973. This book’s section on the Tarigo is very accurate and exquisitely detailed. It incorporates some of the original British logs from the Jervis and the logs confirm the British use of the radar from the Nubian. This book should be used as the base of any re-writing of this story, though it must be kept under consideration that, even by the time of the second edition, news about ULTRA and British intelligence in general were still in the future.
From this book we learn new details. The German ships were laden with troops, while the Italian Sabaudia was carrying ammunitions. These ammunitions, as the Jervis report shows, were of German manufacture. The lead escort, R.N. Tarigo, was under the command of ap. Di freg. Piero De Cristofaro. The other two units were replacements of the originally scheduled Strale and Euro. These were the lighter destroyers R.N. Lampo under the command of cap. Di corv. E. Marano and the R.N. Baleno, under the command of cap. Di corv. Arnaud.
The lighter destroyers R.N. Lampo
On April 13th, the Axis was already aware of the arrival of four new destroyers at Malta and in the evening of the same day, the CAT was asked to intervene. Early on the 15th, the convoy had been scattered by bad weather and was about 4 hours behind schedule. Around 1:00 PM a British plane bearing the marking OHSF was sighted by the convoy which gave the alarm to Supermarina. The British plane follows the convoy and around 2:00 PM sends a new signal to base which is intercepted by Supermarina. The Naval high command requests assistance from Superaereo, the Air Force High Command. Of the two S 79’s dispatched by Superaereo only one takes off and at 6:45 PM, Supermarina is informed that, due to the weather conditions, the aircraft had to return to base. Wind is reported at about 80 Km/h. Supermarina then instructs the convoy to change route and, passing buoy 4 of the Kerkenah, to follow the coast line. The convoy will never reach buoy 4 because the British force will reach and destroy it between buoy 2 and 3.
The official Italian report says that on April 27 and May 7, Italian forces under the command of cap. di feg. Eliseo Porta will rescue some important documents from the sunken Mohawk. These rescue attempts were also repeated on June 22nd and 23rd. According to the official Italian report, the only document of value rescued was the “Mediterranean Stationary Order Book”. Other authors contradict this assertion; they actually affirm that documents rescued from the Mohawk were essential to the success of the Xa MAS attach against the port of Alexandria.
The official war records were preceeded, in 1957, by Marc’Antonio Bragadin’s “The Italian Navy in WW II” originally published in Italian in 1948. Bragadin’s relatively long discourse on the Tarigo is full of errors and makes us wonder if his book is not in desperate need of updating, a proposition which the publisher should consider since the work is a milestone. Bragadin reports that the British force was never sighted by the Italo-German reconnaissance, but the official Italian report shows that the CAT (Italian denomination for the Luftwaffe in Sicily) had requested direct intervention.
According to Bragadin, the Italian convoy was attacked from both air and sea, but we have no other confirmation of this fact. Most authors, in addition to the official reports, agree that the convoy was shadowed by British reconnaissance planes, but never attacked from the air. Bragadin also assumes that, in addition to the sunken Mohawk, some other British vessels might have received damage, but there is no other report to corroborate such an assumption. Finally, Bragadin does not mention the use of radar, but on the other hand it describes the rescue operation quite accurately.
In 1964, Donald Macintyre, an author at times forgotten, dedicated several paragraphs to the episode in hib book “The Battle for the Mediterranean”. Macintyre is disingenuous when he says that the British lacked radar. Derek House’s Radar at Sea” published in 1993 clearly shows that three out of the four British destroyers involved in the action were indeed equipped with the latest radar sets. By the time Macintyre wrote his book, it was common knowledge that many nocturnal naval engagements were sought and won by the British, mostly due to their overwhelming technical superiority. Another inaccuracy, later picked up by other authors, was the number of Axis casualties which, although reported at 350, were actually over 700.
In 1976, the famous Italian historian Arrigo Petacco, who specializes in WW II Italian history, wrote in his “Le Battaglie nel Mediterraneo” a quite terse report, which was indeed accurate. Surprisingly, he mentions the name of Lieutenant Ettore Bisagno, the junior officer who, while his ship was sinking, trained the torpedo tube launcher on the enemy, managing to hit and sink the Mohawk. This detail had been previously published by Antonio Trizzino.
What followed is in engaging book written by a Spaniard Naval officer, Louis de la Sierra. His report is long, and in essence accurate, even though he also makes the mistake of reporting that the British did not have radar.. De La Sierra blames the delay of the convoy on bad weather in Naples, while the Italian report refers to foul weather while crossing the Channel of Sicily. He also reports that no Italian plane was sent in support of the convoy, a statement while not literally accurate, fully explains reality. Suddenly, in De La Sierra’s report the weather improves, while the last entry in the Italian report still refers to fog and squalls. De La Sierra continues his misled narration by reporting the accurate time of the first sighting (note, accurate if we refer to the log of the Jervis) as 1:58 AM of April 16th, but referring to it as a “visual” sighting and not as a radar one. What De La Sierra is saying is quite absurd. The moon was from South–SouthEast, which happens to be the same position of the British force and they can see the convoy, but the convoy cannot see them. The opposite would instead be true. The British would move behind the convoy so that the moon would hide them and illuminate the Axis ships.
The Lampo is reported rescued after four months of work, while the Italian report refers to “a couple of months.” Either way, this vessel re-entered service. Also it appears that only the hospital ship Arno was part of the rescuing group and what De La Sierra reports as a second Hospital ship was just a merchant ship. He also reports only 350 casualties. These mistakes probably originate from Macintyre’s bookNevertheless, this book should be taken into consideration because at times it has the interesting interpretation of a sailor who has sailed the same sea, watched the same stars and dreamed the same dreams. His description of naval tactics is also quite enlightening.
What followed is to be considered a milestone of revisionist history. James Sadkovitch’s “The Italian Navy of WW II”, although accused by Green and Massignani of being too apologetic of the Italian navy, provides new, well documented, and revealing facts which had been lost to the general public. He correctly reports the interception of Axis signals by the British. This was not quite the work of ULTRA, but it falls within the general area of intelligence warfare so skillfully fought by the British. This specific aspect of the war was so diligently covered by professor Santoni’s “ULTRA il vero traditore”. There is no apology by Sadkovich, the facts are clearly explained and documented. What is indeed revealing is the description of the effect the destruction of the convoy had on the Italian military and government, especially in terms of access to the Tunisian ports. Not a single detail in Sadkovitch’s report is arguable and it creates a new, and higher, standard for historical reporting.
In 1993, the widely published author Bernard Ireland summarizes these events in less than a long paragraph managing to squeeze in a few mistakes, such as the Italian vessel which launched torpedoes at the Jervis; it was the Lampo and not the Tarigo. He also reports the Lampo and Baleno as torpedo boats, even though at 1,220 tons they were full-fledged destroyers. Once again the interception is due to “hard steaming” and there is no mention of the radar
In 1998 Green and Massignani wrote another milestone and perhaps the ultimate book about the naval war in the Mediterranean and an expanded report on the loss of the Tarigo convoy. The book, “The Naval War in the Mediterranean”, has an excellent summary of the events and it expands on the Italian attempts to rescue the cipher book left on the sinking Mohawk. According to the authors, documents rescued from the Mohawk (Eliseo Porta was part of the Xa MAS) helped with the attack on the Alexandria, soon to be conducted by the Xa MAS. The book offers additional details such as the plane intercepting the Italian convoy (it was a Maryland). The authors are accurate in reporting that ULTRA did not directly effect the action, and as Sadkowich has done before, they report that the British had indeed intercepted Axis signals.
Conclusions
Should we disregard all previously written books and focus only on the very latest literature? Should we, as Green and Massignani might suggest, disregard Borghese’s book about the Xa MAS? We do not think so. It would be a great tragedy if all the published and unpublished literature on this period were to be disregarded. The understanding of the evolution and interpretation of these historic events is as important as history itself. Ultimately, the continuously evolving historical evaluation of these events keeps them alive today as they were almost 60 years ago.
Unfortunately, badly written books like Bernard Ireland’s “War in the Mediterranean” are still published and sold. Authors like Ireland replaced well-researched history with fallacious narrative at a price of a few guineas. Readers should experience all books, and at the same time be always open minded to the idea that interpretation of historical facts can be less a science than one might expect. Ultimately, the Tarigo action brought about the loss of a few dozen ……….and hundreds of German and British lives and to those soldiers and sailors we owe the respect which can be offered by keeping history alive. In doing so, we celebrate authors like Green and Massignani who strive so much for historical accuracy.
Ultimately, when newer war records are released by the British government, a new generation of historians will update our current understanding of the facts, thus giving us a yet more accurate interpretation of these events and their meaning in history.
Shelling of Genoa
February 9th, 1941
At the beginning of 1941, the British government sought to further the already low Italian moral, thus forcing the weaker of the Axis powers to a separate peace. After the successful arrival of the Luftwaffe in Italy in early 1941 and the sinking of the cruiser Southampton, the British were in need of re-establishing their control over the Mediterranean. The same action which saw the destruction of the Southampton, also saw the damaging of the cruiser Gloucester and the carrier Illustrious.
British
Commander at Sea: Sommerville
Battleship: Renown, Malaya
Carrier: Ark Royal
Cruiser: Sheffield
Destroyer 10
Italian
Commander at Sea: Iachino
Battleship: Vittorio Veneto, Cesare, Doria
Heavy Cruiser: Trento, Trieste, Bolzano
Destroyer 10
A new action called for the bombardment of Genoa where the Italian battleships Littorio and Cesare were thought to be undergoing repairs. Even after it was ascertained that the battleships were not in port but were actually being refitted in La Spezia, Genoa was kept as the primary target.
The overall command at sea was assigned to Admiral Sommerville, commander of the Gibraltar-based force H. The action was very audacious; it called for a large naval force to sail the 700 miles between Gibraltar and the Ligurian coast to bombard port and industrial facilities.
The battlecruiser HJ.M.S. Renown
The operation was scheduled for the end of January, and on the 31st Force H left Gibraltar. Adverse atmospheric conditions dissuaded the commander from continuing the action, when the ships had already reached Sardinia. The airplanes of the Ark Royal tried, without success, to torpedo the dam on the Tirso River in Sardinia. Again, the British force left port on the 6th of February. On the 8th, alerted by various sources, the Italian fleet consisting of the Vittorio Veneto, Cesare and Doria left La Spezia with the escort of 8 destroyers. Later, three cruisers of the 8th squadron along with two more destroyers joined the search.
Undetected, the British force arrived near Genoa on the 9th and began a naval bombardment, which started at 8:15 AM and lasted one hour and 30 minutes.
The Malaya targeted the docks, while the Renown and the Sheffield focused on the industrial area. The Sheffield fired 782 salvos, while the battleships expended 272 15″ shells and over 400 4.5″ shells. Four merchant ships and a training vessel were sunk, while another 18 were damaged. The Italians suffered 144 casualties, many of whom were amongst the local population. The British lost one of the Ark Royal’s Swordfish.
While the British forces were sailing out of the Tyrrhenian sea, Admiral Iachino was steaming on a 330’ course which was going to bring him into contact at around 15:00. Instead, due to faulty instructions from Supermarina, the Italian forces changed direction toward Italy on a 30’course. The Italians were so sure of imminent battle that the Vittorio Veneto even had her 15’ gun loaded. A great opportunity was lost, and the British were completely unaware that they had escaped a possible deadly confrontation.
Almost non-existing aerial reconnaissance and erroneous sighting hampered the Italian fleet. At 12.00 o’clock, an Italian airplane sighted the British formation but before it could give its position, it was shot down. Its crew was later picked up by the torpedo boat Masa but only at 17.55 was the alarm finally given: too late for the Italians to catch the fleeing British. So, after having given chase to a French convoy mistaken for the retreating British, the Italian fleet ultimately returned to port.
The material damage was not too serious, but the fact that the British fleet could come to the doorsteps of Italy without been intercepted was troublesome. Ultimately, the bombardment of Genoa was an Italian humiliation, which further destabilized the Fascist Party’s grip on Italy.
It should be mentioned that Antonio Trizzino, in his book Ships and Armchairs (Navi e Poltrone), assert that the principal reason for the British action was the intention of sending a message to the Spaniards in advance of the meeting between Mussolini and Franco which was held in Bordighera, near Genoa, on February 11.
Raid of Otranto
November 12th, 1940
On 11th at 18:00 British cruisers left the main battle fleet (Operation M.B.8 and Taranto’s Night) in the direction of the Strait of Otranto, between Italy and Albania, to intercept naval traffic. After having entered the Adriatic Sea undetected, the British force was able to detect an Italian convoy directed from Brindisi to Valona. The action took place between 1:05 and 1:50 on the 12th of November. The British squadron included the cruisers Orion, Ajax, and Sydney escorted by the Tribal class destroyers Nubian and Mohawk under the command of V.A. Sir Henry Pridham-Wippel.
The Italian convoy included the cargo ships Antonio Locatelli (5,691 t.), Premuda (4,427 t.), Capo Vado (4,391 t.) and Catalani (2,429 t.) escorted by the aging torpedo boat Fabrizi, comanded by T.V.c. Giovanni Barbini, and the auxiliary cruiser Ramb 3, commanded by C.F. Francesco De Angelis. The action was swift; once they located the Italian convoy, the British sank all Italian cargoes, despite the heroic fight put up by the Fabrizi which, in the process, was seriously damaged. Less admirable was the behavior of the Ramb 3, which, after the initial exchange of fire, quickly left the cargo ships to their destiny.

The Torpedo Boat R.N. Nicola Fabrizi
Later that day, the Italian torpedo boats Curtatone and Solferino rescued a total of 140 sailors, while the casualties totaled 36 dead and 42 wounded, including the fallen aboard the Fabrizi. Commander Barbini, for the heroic perseverance shown during the action was awarded the Gold Medal for bravery. Italian retaliation was immediate, but the Regia Aeronautica failed to locate the fleeing British fleet and the few Cants which eventually located the British ships were quickly shot down.
Taranto’s Night
Introduction
Following the Battle of Punta Stilo (Encounter off Calabria), the Regia Marina had decisively implemented the policy of “Fleet in Being”. The theory behind this doctrine assumed that the threat of a powerful navy would be enough to deter the enemy from conducting an active campaign. Perhaps this approach reflected the general expectations of the Italian armed forces, which saw this war as a short prelude to a very bountiful armistice. To be fair, the various armed forces, perhaps partially excluding the Regia Aeronautica, were very well aware of the limitations of the Italian war machine. It is surprising to see that the Regia Marina, which knew that a prolonged confrontation would bring about her demise, did not actively pursued a decisive confrontation against the British Navy. Perhaps, the memories of Lissa had not yet faded.
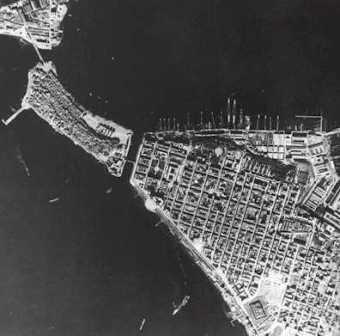
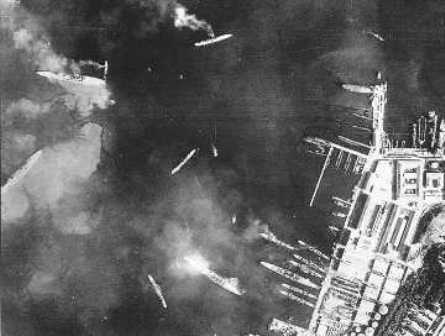
Aerial picture of Taranto
Different sources attribute Italian inactivity to the fact that the two Littorio Class battleships, which had just completed training, were not fully prepared for action. Undoubtedly, during early July these ships had experienced serious technical problems, including the failure of one of the main turrets due to water infiltration, but by early November these ships should have been considered fully readied.
Perhaps referential fear toward the Royal Navy kept Supermarina from acting with more resolution, or perhaps it was a more complex collection of reasons. Nevertheless, Italian inactivity prompted British action and so evolved the operation, which led to the deadly aerial attack against the naval base of Taranto.
The war in the Mediterranean, after a period of relative inactivity, suddenly surged after the October 28 ultimatum Italy imposed on Greece. The Italian request for the use of Greek bases was unacceptable and a Greek refusal was expected. Great Britain was immediately asked to step up assistance, while Italian troops poured into Greece from the Albanian front. The Greek campaign had not been coordinated with the German Ally and not only did it created friction between the two dictators, it also led to an embarrassing Italian debacle on land.
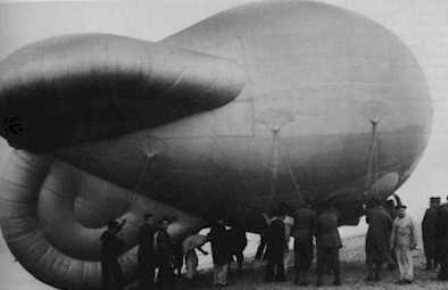
Italian Barrage Balloon
During the Ethiopian crisis, when Great Britain and Italy appeared to be on the verge of an armed conflict, the Royal Navy conducted studies regarding the possibility of attacking the Italian naval base of Taranto. The plan, due to the resolution of the international political situation, was filed away, but not for long. Towards the end of the year 1940, Rear-Admiral Lyster began, once again, to plan an aerial attack on the large naval base.
The attack against the Italian naval base of Taranto, codenamed “Operation Judgment”, as we have already mentioned, was part of a greater plan of action which saw British naval vessels crisscross the Mediterranean. Operation M.B. 8, and along with it the Taranto’s raid, were scheduled around the 21st of October, Trafalgar day. Several technical problems, including a fire aboard the Illustrious and the withdrawal of the aircraft carrier Eagle(1), caused a postponement. Some of the air complements from the Eagle were transferred aboard the Illustrious
It is now known that the damages to the Eagle dated back to the battle of Punta Stilo when several near misses caused serious structural damage to the ship, including the fuel system.
British Aerial Reconnaissance
The success of the attack relied mostly on the accuracy and timeliness of the air reconnaissance over the Italian base. The effectiveness of the mission had been greatly improved with the arrival in the Mediterranean theatre of the new aircraft Maryland. Two days before the attack, a Maryland from Malta confirmed that the Italian fleet was still in Taranto and that another battleship had reached port, bringing the total to six.
Maryland was the British denomination for the American-built Glenn Martin which was produced by the Glenn Martin Aircraft Company of Baltimore, Maryland. These planes had been produced for the French Air Force, but the German occupation of France cause the final shipment to be diverted to Great Britain where the original crates were opened and the content assembled.

Glenn Martin “Maryland”
Three of these aircraft were sent to the Mediterranean after a long flight over occupied France and Sardinia. The flight took place on the 6th of September, 13 days ahead of schedule, and took all night. Squadron Leader Ernest Alfred Whitley had just transferred from a previous assignment with the N.22 Beaufort Torpedo Squadron of the RAF Coastal Command. The new unit was designated No.431 General Reconnaissance Flight and was based in Malta.The other pilots were Officer Foxton and Flight Sergeant Bibby.
This twin-engine bomber was never used by the US Air Force, it was ordered only by France and Britain. The designation A-22 was used for aircraft built under lend-lease contracts. The Maryland was a sleek bomber with a good performance, but a very cramped fuselage; hence the development of the A-30 Baltimore with a deeper fuselage. About 450 were built.
Italian Defences
In a report sent by Supermarina to “Comando Supremo” immediately following the British attack, the defenses of the military stronghold were described as follows:
Antiaircraft defenses fully active and including:
21 batteries armed with 101 mm guns
68 machine-gun installations for a total of 84 barrels both on fixed and floating positions
109 light machine-guns both in fixed and floating positions.
Antiaircraft obstructions consisting of 27 round balloons, 16 moored west and north of the ships on the Tarantola jetty. 11 moored along the eastern part of the same jetty.
The balloons should have been 90, but bad weather in the days before the attack had caused about 60 balloons to be lost. Due to a shortage in the local production of hydrogen, spare barrage balloons could not be deployed. Reportedly, the actual number of balloon in the air the night of the attack was 27. The original balloons were spherical and therefore not really aerodynamic, while later pictures show that the Italians implemented a design similar to the one already in use in Great Britain with the balloon looking like a rugby ball with fins.
Network of aerial detection
Included 13 stations equipped with listening devices, two of which were directly connected to projectors. Of the 22 projectors available, mostly of recent construction, some were installed on land and others on floating pontoons. Projectors installed aboard most ships could provide further assistance
Anti-torpedo netting
Of the 12,800 meters of nets originally intended for the defense of ships moored in Mar Grande (the outer lagoon), only 4,200 were installed. An additional 2,900 meters had recently arrived but had not been deployed. Domestic manufacturing of this netting amounted to about 3,600 meters per month and therefore the completion of the protective barriers was not expected before sometime in 1941. These nets were only 10 meters deep, thus leaving a space of about 5 meters between the end of the net and the bottom of the lagoon.
All naval military units belonging to the various squadrons were ready to get under way in less than three hours. Also, all units had their weapons manned and ammunitions were already loaded. In case of alarm, all ships were to stay at their existing mooring which, according to the authorities, had been studied to provide for the highest degree of defense. Guns aboard ships were not to open fire along with the local defense to avoid providing the enemy with easily identifiable targets. Projectors installed aboard ships were to be used to blind the incoming planes and, during nights of full moon, could be kept lit at will. Naturally, allowing these projectors to operate when the night was already fluorescent provided for any significant decrement to their defenses.
The port had already experienced innumerable air raid alarms, mostly triggered by reconnaissance planes. All ships were lying at single anchor, meaning that only one of the two extremities of the ship, in this case the bow, was secured, thus allowing the ship to rotate 360 degrees. All these defensive measures were based on some fundamentally flawed assumptions. First, the Italian did not know that the British had overcome a problem known as the “deep”, meaning the sudden diving of a torpedo, launched from an airplane, into the water before re-emerging. Second, they grossly underestimated the minimal distance from the target required for a launch .
It is interesting to note that in his lesser-known book “Aerial Warfare”, published in 1943, Hal Goodwin does not cite any Italian torpedo bomber. This was not an accident. Despite the notoriety gained by the famous Savoia Marchetti s.79, the Italian air force entered the war without a single torpedo plane. This lack of vision not only caused the Italians to fall behind in this, soon-to-become, crucial warfare, but also slowed down the process of creating counter measures. Simply, the Italian Navy did not know that a torpedo plane flying level with the water at a slower speed and in a straight path could drop a torpedo without having the weapon dip more than 15 meters into the water. Also unknown to the Italians, a torpedo could now be triggered not only by contact, but also by proximity using a device called duplex (dual action). Even if fully deployed, Italian netting was only 10 meters deep and, therefore, British torpedoes could easily steer under it. If they actually did is an open question. By looking at the position of the nets and at the trajectory of the torpedoes, it does not look like netting was an issue.
It is known that, following the attack, some of the British torpedoes were recovered and it would be safe to assume that the Italian industry was immediately made aware of these new technological advantages. Most of the defense measures implemented in Taranto were outlined in a dispatch numbered 35901, which was issued following the attacks on Tobruk and Augusta. The commander of Taranto, Adm. Antonio Pasetti, asserted that a full rectangular fence to be constructed around each ship would have provided the only effective defenses. This measure, judged by the chief of the 1st Squadron to be too radical, was not implemented due to assumed difficulties in letting ships in and out of this defensive perimeter. Nevertheless, this polemic was purely rhetorical because there was not enough net available.
Le azioni navali in Mediterraneo, Adm. Giuseppe Fioravanzo, page 226.
The Attack
Leading to the attack
Before reaching her assigned position, the Illustrious had to endure problems with her aircraft, which, if not brought under control, could have easily jeopardized the whole action. At 12:19 of the 9th, a Swordfish launched by the Illustrious experienced engine trouble and was forced to crash land near the Warspite. On the 10th, at around 7:00 another Swordfish experienced similar problems and was lost. The same day, Italian planes continued attacking the British force, now fast approaching Malta, but around mid-day a Cant 501 was lost. A later attack conducted by ten bombers did not cause any damage.

Aerial picture
At mid-day on the 11th, the fleet was already halfway back toward Crete and, during a routine flight, another Swordfish was lost. The situation had become worrisome; three planes of the already dwindling task force had been lost. The three vehicles belonged to the 819th Squadron and had been refueled from the same fuel depot. After an inspection, it was discovered that the gasoline in the depot was contaminated with water, sand and mold.
The attack
The night of November 11th, a few miles off the Greek island of Cephalonia, about 170 miles from Taranto, the Illustrious released her Swordfish aircraft which, undetected, reached Taranto in two waves of 12 and 9 airplanes each. One of the planes in the first wave, due to a navigational error, reached Taranto 15 minutes before the rest of the squadron, causing the antiaircraft defenses to go into full alert.
First Wave
Flares and bombs
At 10:58 PM the two flare-launchers started their action. The two swordfish (Kiggell, L4P and Lamb L5B), flew over Cape San Vito, coasted the southern boundary of Mar Grande and began launching flares near the point in which the Tarantola’s jetty meets land. Each plane dropped 9 flares, which provided a good back stage illumination for the incoming torpedo bombers. The dropping stopped just past the end of the balloon barrage, slightly north of the Doria. After a sharp turn, the two planes zigzagged back towards the large oil depot where they conducted an unsuccessful diving attack against an oil depot, and then headed back toward the safety of the sea.
Torpedoes
Williamson-Scarlet, L4A
At 23:14, crewmembers aboard the destroyer Fulmine witnessed the downing of Williamson-Scarlet’s swordfish. Their plane, after a slow descent with the engine cut off, had successfully launched a torpedo toward the Cavour, but it had been stricken by anti-airplane gunfire from the Cesare. The two crewmembers were later rescued. They had flown over San Pietro Island, north of the smaller San Pietro island and almost straight across the bay through the Tarantola balloon barrage; the torpedo had literally squeezed between the destroyer Fulmine and the Lampo. The two crewmembers were picked up by dock workers, roughed up and then delivered to the Navy.
Maculay-Wray L4R and Sparke-Neale L4C
These crews followed the same approach route taken by their leader Williams. Instead of launching at the already stricken Cavour, their weapons were aimed at the further back-moored Doria. The planes flew between the destroyer Lampo and Baleno, and retracing their original route, they returned toward the Bay of Taranto. At 23:15, aboard the Doria, crew witnessed two explosions just near the ships’ bow. These explosions were mistaken for bombs, but it is safe to assume that they were actually caused by the torpedoes exploding upon contact with the bottom. These crews could have easily aimed at the Vittorio Veneto, which was in slightly deeper waters.
Kemp-Baley L4K
Chronologically speaking, the attack which followed was the one conducted by Lt. N.M. Kemp. He flew north of San Pietro Island, north of the balloon barrage protecting the heavy cruisers to then sharply fly south towards the battleships. His altitude, estimated at about 1200 meters during the approach, suddenly decreased to a few meters before the launch. The torpedo quickly ran toward the Littorio striking the ship on her starboard bow. The crew rapidly left the bullet-infested Mar Grande, flying straight to the south near the Capo San Vito.
Swayne-Buscall L4M
Their maneuver was different from the one by Kemp-Bailey, but achieved the same result torpedoing the Littorio’s starboard stern. Their flight path took them north of the San Pietro island, south of the “Secca della Sirena” to then make a sweeping 180 degree turn over the Littorio. Their escape route took them over the San Pietro Island and back into the Gulf of Taranto.
Maud-Bull E4F
This plane was the last one to the scene. It flew over Punta Rondinella, north of the cruisers and then squeezed a torpedo between the Duilio and the Littorio towards the Vittorio Veneto. The weapon entered the water but then exploded upon contact with the bottom, probably victim of a heavy “sack”. The plane went back into the Gulf of Taranto, flying over the Island of San Pietro.
At 23:15 Patch-Goodwin E5A conducted at attack against the Libeccio in Mar Piccolo, hitting the target which was not seriously damaged since the weapon did not detonate. The hydroplane terminal was attacked by Sarra-Bowker L4L who destroyed two planes and caused a fire which was controlled within 15 minutes.
The first wave was over; damage was great and soon to be worse. The Littorio had received two hits and it was slowly going down by the bow, while the Cavour was been flooded by tons of water. While part of the aircraft of the first wave was conducting the primary attack against the units moored in Mar Grande, a secondary group conducted a bomb attack against units in Mar Piccolo.
Between the attacks
The anti-aircraft guns were silenced between 23:20 and 23:35, but soon planes from the second wave began making their appearance over the sky of Taranto. More planes dropped bombs near the destroyers between 23:30 and 23:40. All weapons fell about 20 to 30 meters short of their target. These were probably the bombs launched by Mardeal-Ferreira and Murray-Paine. Of the two planes, the first repeated the attack twice, due to an early problem with the release mechanism.
Second Wave
Flares and bombs
Hamilton-Weekes L5B and Skelton-Perkins L4F
At 23:35 several airplanes were once again spotted in the skies over Taranto. Between 23:50 and 23:55 seven or eight more flares were dropped by these two planes starting, more or less, at the same point os the previous one, but terminating further north. Following the launch of the flares, the two planes conducted an unsuccessful attack against the oil depot at the naval arsenal.
Torpedoes
Lea-Jones L5H
At 23:55, with the engine cut off, their airplane crossed Punta Rondinella and dropped a torpedo against the Duilio, the first of the battleships moored in Mar Grande. At around midnight, the ship was violently shaken following a hit near the bow.
Hale-Carline L5A or Torrens Spence-Button L5K
A minute past midnight, a torpedo from one of these two planes hit the Littorio for the third time. To this day, it is not known which crew scored the hit.
Wellham-Humphreys E5H
At the same time of the previous two crew, these planes conducted an attack against the Vittorio Veneto, but without scoring .
Bayley-Slaughter E4H
Their airplane was hit by the anti-aircraft fire and plunged into the water. The body of the commander was found and buried with full military honor, while the body of the co-pilot was never found.
Mar Piccolo
In addition to the flare-dropping planes, Clifford-Going L5F conducted a bomb attack against the Trento and the Miraglia. One of the bombs hit the Trento near the forward 10 mm gun causing minor damage, but failing to explode. At 1:22 the alarm was finally called off and the cleanup work immediately began.
Damages and Casualties
he day following the attack the remaining battleships, Giulio Cesare, Vittorio Veneto and Andrea Doria were immediately transferred to Naples, while the salvage operations began on the damaged ones. The Littorio and the Caio Duilio were relatively easy to recover and within a month these ships were already afloat. The Cavour, on the other hand, required a significant investment in time and resources.
R.N. Cavour
The Cavour was moored in the “Mar Grande”, Taranto’s larger lagoon. The ship was hit by a torpedo launched by the Swordfish of Williamson-Scarlet. The explosion took place near the keel and caused a gash of about 12 x 8 meter, in the proximity of the forward ammunition depot.
R.N. Cavour
The unit, considered seriously damaged, was brought closer to shore, but not close enough to avoid partial sinking. After the unit had settled to the bottom, water reached the main deck thus submerging most of the hull. Rescue work started immediately and, already on November 13th, crews were at work.
Aerial picture
Towards the end of 1941 the unit was, once again, seaworthy and it was transferred to Trieste for further repairs and some modernization work. On September 8th, following orders received from the Italian high command, the crew of the Cavour did not scuttle the unit since it was more than 6 months away from being operation. On the 10th, the Germans took control of the battleship. On February 15, 1945, during a heavy aerial bombardment, the ship was hit by several bombs, capsized and finally sunk. It was later scrapped in 1946 and stricken from role on February 27, 1947.
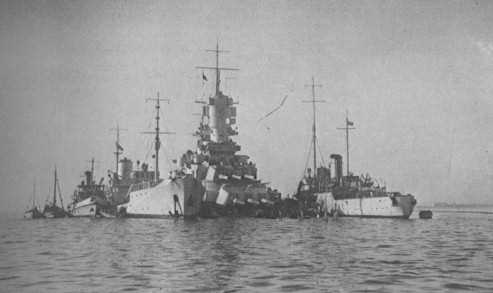
R.N. Duilio
Duilio was hit at around midnight by a torpedo launched from about 400 meters. The explosion caused a hole of about 11 x 7 meters to the right near the forward ammunition depots. At around 4:45 AM of the 12th, the ship was run aground to avoid sinking.
R.N. Duilio
In January of the following year, the unit was once again afloat. On the 3rd of February the unit entered dry dock. During November and January the ship actively participated to the defense of Taranto providing for antiaircraft coverage. On January 26th, the battleship left Taranto, and two days later reached Genoa.
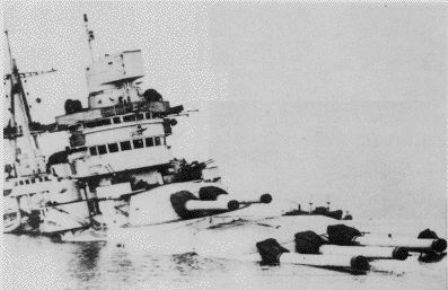
R.N. Littorio
The Littorio was hit by a total of three torpedoes. two to starboard, one under the second turret, near frame 192 and causing damage from frame 187 through frame 192, and the second one aft of the first turret near frame 163, causing damage from frame 159 through frame 165.
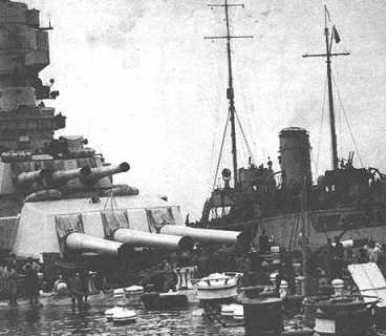
R.N. Littorio
The third weapon hit the ship to port near the rudder control mechanism, causing the partial destruction of the primary rudder.
R.N. Littorio
Despite the heavy damage, the ship was never in peril of sinking, but it was nevertheless decided to let it rest on the muddy bottom of a shallow section of the harbor. Repair work was hampered by the presence of unexploded weapons.
Additional Damage
The destroyer Libeccio and the heavy cruiser Trento were hit by bombs which failed to explode. Bombs fallen near the airport caused the loss of two hydroplanes and a small fire. Minor damages were recorded near the docks, the oil fuel depot and the aqueduct. Several bombs fell in a residential area near the “Ospedale Civile” (hospital), causing several casualties amongst the civilian population.
Casualties
In addition to the civilian population, the Littorio listed 32 casualties, the Cavour 17 and the Duilio 3.
Action off Cape Passero
October 12th, 1940
On October 8 the full weight of the Mediterranean fleet, four battleships, two carriers, a heavy cruiser, five light cruisers and sixteen destroyers, departed Alexandria to provide distant cover for a Malta bound convoy of four steamers. Hidden in part by heavy weather, the convoy made port on October 11 undetected by the Italians. That same day, however, an Italian civil aircraft flying to Libya reported elements of the Mediterranean fleet about 100 miles southeast of the island where they were loitering, waiting to escort three empty cargo vessels back to Alexandria that night. Supermarina had reservations about this sighting because no military aircraft confirmed it; nonetheless, they dispatched several groups of light units to patrol potential transit areas.
R.N. Camicia Nera
They ordered the largest group, 11th Destroyer Flotilla Artigliere, Aviere, Geniere and Camicia Nera, under Captain Carlo Margottini, supported by the 1st Torpedo Boat Flotilla Airone, Alcione and Ariel, under Commander Alberto Banfito to guard the waters east of Malta. Admiral Cunningham, sailing aboard his flag Warspite, established a scouting line of cruisers extending north from his force. The wing ship, light cruiser Ajax, Captain E. D. B. McCarthy, was zig-zagging at 17 knots about seventy miles north of the convoy and about the same distance east, northeast of Malta.
R.N. Artigliere seriously damaged
The weather was moderating from earlier thunderstorms. The moon was up and very bright, just four days short of full. The 1st Torpedo Boat Flotilla was proceeding at 17 knots in a long line of bearing with each ship about 5,000 meters or 5,400 yards apart. Alcione saw Ajax first at 0135 hours on October 12 from about 18,000 meters (19,600 yards). Undetected by the cruiser Alcione reported her contact, requested assistance and proceeded directly to the attack. At 0142 Airone, followed shortly thereafter by Ariel, sighted the cruiser and followed their flotilla mate in. Alcione approached Ajax undetected and fired two torpedoes at Ajax’s port side from a range of just 1,750 meters (1,900 yards). She then turned away to attack from another direction.
Her half salvo missed its target. At 0155 Ajax finally spotted two strange vessels silhouetted against the bright moonlight, one on either side of her bow just several thousand yards off. These vessels were Airone and Ariel. One minute later Airone fired two torpedoes from a range of only 2,000 yards. Ariel followed at 0157 with two more. Ajax flashed a challenge, and, receiving an inappropriate reply, increased speed and altered course. The four torpedoes all ran wide, although at this point Ajax was still uncertain whether or not she was under attack.
Airone, closing rapidly, fired off another pair of torpedoes from 750 yards (also wide) and resolved Ajax’s confusion by opening fire. She snapped off four quick salvos hitting Ajax twice on her bridgeworks and once six feet above her waterline, igniting a fire in a storeroom. The range was down to slightly more than 300 yards when Ajax finally returned fire. Her 112 pound shells smashed the Italian torpedo boat and left her dead in the water. The two antagonists were so close, Ajax’s machine guns could sweep Airone’s deck. Ajax reduced speed to 25 knots and shifted heading constantly to avoid torpedoes and gunfire. She fired two torpedoes of her own, one of which might have hit, adding to the misery of Airone’s crew.
With Airone in a sinking condition, Ajax turned the attention of her main batteries to Ariel, returning her fire and quickly scoring one hit from 4,000 yards. This may have penetrated a magazine because Ariel blew up and sank within a few minutes, taking most of her crew with her. The time was 0214. When Alcione finally returned from her extended maneuver she found the British ship gone, Ariel sunk and Airone on fire and slowly following. She could do nothing but rescue survivors, saving 125, about half the complement of the two ships. Airone finally went under at 0235.
Meanwhile, the 11th Destroyer Flotilla, alerted by Alcione’s original message of forty-five prior was hurrying to the battle in an extended column with Artigliere leading followed by Aviere, Camicia Nera and Geniere. Aviere found the British light cruiser first, but Ajax was fully alert and, at 0218, she hit Aviere lightly on her bow before the Italian could fire any torpedoes. Aviere turned and lost contact. Artigliere, the flotilla flagship, came in next. Maneuvering at high speed she fired a single torpedo at Ajax’s starboard side, which missed, and began trading gunfire with the cruiser. Initially the Italian, steaming at a high speed and zig-zagging got the better of the exchange, hitting Ajax four times, putting out her radar and knocking out one of her 4″ secondary battery.
The moon had just set; reducing the general illumination and depriving Ajax of the backlight that made the Italian ships, stand out. Not equipped with flashless gunpowder, the repeated flashes from Ajax’s guns blinded her crew with every salvo. Nonetheless, at 0230 Ajax’s gunners finally hit the elusive Artigliere and hit her hard, killing the flotilla commander, Captain Margottini and bringing her to a halt. By 0232 Artigliere was dead in the water and her guns silent. The other two destroyers of the flotilla remained in the offing. Camicia Nera and Ajax exchanged ineffective salvos from about 5,500 yards. Ajax believed she was facing two cruisers, so when Nera disappeared into a smoke screen of her own devise, Ajax used the opportunity to break contact and turn toward the fleet. Geniere, following at some distance, never entered action.
The remainder of Ajax’s squadron concentrated on Ajax’s position, but arrived to late to see any action. Ajax suffered 13 killed and 22 wounded in this action. She expended 490 6″ shells and 4 torpedoes. Ajax’s damage was patched up in a couple of weeks and she was back in action by November 5. Camicia Nere took Artigliere in tow, but she was forced to abandon the damaged ship the next morning when two British cruisers and four destroyers approached. The British heavy cruiser York finished off Artigliere at 0905 with torpedoes. Italian reinforcements of three heavy cruisers and three destroyers sailing from Messina arrived too late to save Artigliere or to engage the York group.
Analysis
This action is worthy of analysis on several levels. English historians almost universally describe how the British Navy established a moral ascendancy or superiority over their Italian counterparts as a result of Calabria. This action, however, the first night action fought between the Italian and British navies, was more important in defining a relationship between the two navies. After Calabria, the Italian Navy never hesitated to deploy their battlefleet (fuel and opportunity permitting) or to seek battle with the British under favorable conditions. Indeed, one reason why Cunningham had four battleships at sea at the time of this action was because: “as four Italian battleships had been sighted at sea on the previous occasion, this time our whole fleet went out to cover the operation.”(1) Whereas Supermarina could consider Calabria a draw, the action of October 12 permitted no such conclusion.
Greene & Massignani, The Naval War in the Mediterranean 1940-1943
In fact, Supermarina must have been severely depressed by the results. The Italian destroyers and torpedo boats were supposed to be highly trained, almost elite units. In their attack on the Ajax they enjoyed every possible advantage. They achieved surprise and aggressively pressed their attacks to close range, but accomplished nothing with their principle weapon, the torpedo. The analysis of Marc’ Bragadin rings true of the conclusions Supermarina must have drawn at the time and is worth quoting at length: “The reports about the battle gave reason for much reflection. The enemy had escaped with only a few hits scored by the guns of the Airone and the Ariel, damage about equal in all to that suffered by the Aviere alone. The Italians, on the other had, had lost a destroyer and two destroyer escorts; yet the Italian ships were among the more efficient in the Navy, and their commanders were outstanding
Sadkovich, The Italian Navy in World War II
Each ship that had come into contact with the enemy had conducted herself gallantly in every respect, even to the point of gaining the enemy’s admiration. But it had to be admitted that the Italians were technically inferior to the British, at least as far as carrying out night encounters at sea was concerned.” (not aware of radar) “the outcome of the encounter with the Ajax was most disconcerting.” (2) Bragadin, with postwar hindsight, concludes that the Type 279 air search radar possessed by Ajax at the beginning of the battle was responsible for the ultimate outcome. “In reality this inferiority was probably to be explained solely by the fact that the Ajax was equipped with radar.” (3) However, the impact played by radar on this action has been downplayed by most historians. James Sadkovich: “The Ajax fired visually because its Type 279 radar could not lay guns, but the Italians were silhouetted against the moon, and radar seems initially to have warned the cruiser of their presence.” (4) Bernard Ireland flatly asserts: “Ajax had not benefited from her radar, which was designed to detect and range aircraft and which, in any case, had been damaged by the shock of gunfire.” (5) At the time the facts of the battle were similar to both sides. From the Italian point of view, two flotillas, one after the other, had attacked a solitary British cruiser aggressively and from close range, and had been roundly defeated, inflicting little damage in return. From the British point of view they had repelled the attacks of four destroyers and two cruisers with “resolution and skill,” (6) inflicting heavy damage on the enemy.
Each side drew the opposite conclusion. For the Italians night actions were to be avoided. For the British night actions were to be courted. In a way, both Supermarina and the Admiralty used the results of this action to endorse and confirm prewar decisions they had made regarding nighttime operations. Although the Italian Navy conducted night practices during the twenties, in the next decade “a decision was made for the battle fleet to decline night engagements.” (7) And guns of 8″ and above were not supplied with flashless powder. The Royal Navies, on the other hand trained to fight at night and their doctrine endorsed seeking out and engaging the enemy at night (although, they did not supply even their light forces with flashless powder). These were the lessons drawn from the Action of October 12. But were they the right lessons?
Jack Greene and Alessandro Massignani ask the proper question and propose at least a partial answer. “Both British and Italian accounts speak of the ‘great gallantry’ of the destroyers’ crews. But how could at least seven torpedoes, fired from several different directions, fail to hit? Part of the reason was surely the brilliant conduct of McCarthy during the action. Vice-Admiral Pridham Wippell would later say he handled his ship with promptitude, ability and great determination.” (8) McCarthy, without doubt fought a good fight, but the tactics employed by the Italian forces surely had something to do with his success. In brief, the Italians squandered the advantage of surprise, they attacked piecemeal, and they greatly assisted Ajax’s shooting by fighting the battle at far too close a range.
In terms of the many other nighttime torpedo actions fought during World War II, particularly the successful ones, the following analysis is relevant: “Commenting on this incident after the war, the German Admiral, Eberhard Weichold, who was liaison officer with Italian HQ in Rome in 1941 and subsequently German C-in-C Mediterranean . . . “attributed the Italian losses without accompanying success to the clearness of the night, and the insufficient number of the boats employed in the tactical execution of the attack.” (9) The 1st Torpedo Boat Flotilla made no effort to concentrate and attack as a unit. Moreover, each of the three Italian torpedo boats had four tubes mounted on the centerline and so were capable of firing full salvos of four torpedoes each. Instead, when each boat attacked, she fired a half salvo. Twelve torpedoes launched simultaneously were always more deadly than penny packets of two launched independently.
All the hits scored by Ajax were made at very close ranges, 4,000 yards and below. In fact, much of the damaged suffered by the light cruiser was self inflicted from firing her guns at a low depression for extended periods of time. Although Ajax was hit seven times in return, the damage a shell from a 3.9″ or 4.7″ gun could inflict on a lightly armored vessel was far less, all things being equal, than the shell from a 6″ gun could inflict on an unarmored vessel. When the destroyers attacked, they merely repeated the mistakes of the torpedoes boats without enjoying the benefits of launching a surprise torpedo attack.
Moreover, with the exception of the unfortunate Artigliere, their attack was not pressed very vigorously. In retrospect, the results of this action, at least from the Italian point of view, indicated the need for more training and a re-thinking of their doctrine. Gallantry was not the primary quality required by the situation. Control and coordination would have served the Italians far better. As it was, Ajax found herself rather like the shooter in a target gallery knocking down the ducks as they appeared in order, one after the other. A far better tactic would have been to attack in masse, using weapons in masse. The results could have, and should have been far different. The tragedy for the Italian Navy was that they drew the wrong conclusion from the results of this action and, in effect, conceded the night to the British.
Primary references:
Bragadin, The Italian Navy in World War II Greene & Massignani, The Naval War in the Mediterranean 1940-1943 Ireland, The War in the Mediterranean 1940-1943 Sadkovich, The Italian Navy in World War II Cunningham, A Sailor’s Odyssey Brown, Warship Losses of World War II Rohwer & Hummelchen, Chronology of the War at Sea 1939-1945 Gill, Royal Australian Navy 1939-1942 Macintyre, The Battle for the Mediterranean Footnotes: 1. Cunningham 278 2. Bragadin 39-40 3. Bragadin 40 4. Sadkovich 88fn 5. Ireland 48 6. Cunningham 278 7. Greene and Massignani 39 8. Greene and Massignani 98 9. Gill 225
Sinking of the Espero
June 28th, 1940
The Destroyer Espero, under the command of Captain Enrico Baroni, was the lead escort of a fast troop convoy which also included the destroyers Ostro and Zaffiro. The three ships were tasked with the transfer of two units of Black Shirts (160 soldiers) from Taranto to bolster the defense of Tobruk.
R.N. Espero
The Italian Convoy was sighted by Vide-Admiral Tovey’s 7th Cruiser Squadron at around 6:30 PM of June 28th, 100 miles north of Tobruk. H.M.S. Liverpool opened fire at 6:32 PM at a range of 18,000 yards. While the Italian convoy steamed at high speed toward Tobruk in direction South, South-West, the 7th Squadron was organized into pursuit with the 1st Division (H.M.S. Orion, H.M.S. Neptune and H.M.A.S. Sydney) at the starboard and the 2nd Division (H.M.S. Liverpool and H.M.S. Gloucester) to port. The ships of the 2nd Division were newer and larger units.
At 7:20 PM range had decreased to 14,000 yards. With his ship already hit by several salvoes, Captain Baroni continued zigzagging and making smoke while engaging the overwhelmingly more powerful British squadron, thus allowing the escape of the two other ships.
The Espero was sunk by the H.M.A.S. Sydney which then rescued 47 survivors. The British units had expended an unreasonable high number of ammunitions, almost 5000 rounds. Captain Baroni was awarded, posthumously, the “Medaglia d’Oro al Valor Militare”, Italy’s highest recognition.